To receive jobs from the server, a client must connect and login to the server. There are two types of clients: system clients for remote location systems, and browser clients for users. The server maintains a list of known locations and users for a company, and passwords, in order to authenticate the connection. The locations are identified by a company ID, location ID, and a password.
The initial page is a list of known location ID's. From this page, you can select a location to edit, or add a new location by pressing the Add button.
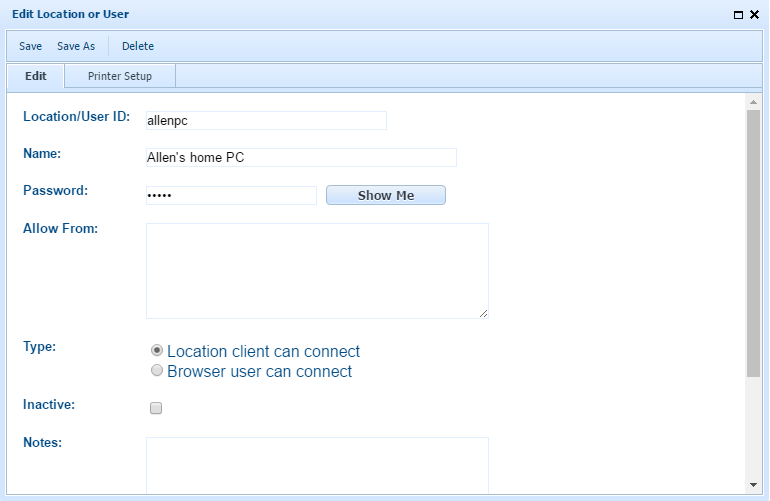
Location/User ID is the unique ID for a location or user. The client software at this location must be configured with this ID when it connects to this server. If you change this ID on an existing record, references to the original ID throughout the system are re-named to the new ID automatically. The remote location's configuration will require updating manually or with a connection link email.
Description is an information field.
Password is the password the location client must provide when connecting to this server. The client software at this location must be configured with this password. This entry is obscured when editing. Click the Show Me button to see the password text. Click the Reset button to generate a random password. Following this step, you must save the record, or save and send a connect link, for the change to be permanent.
Login ID is a display-only field. This is a company-specific login ID for system and browser clients. The format is userid@companyid. If the connection URL used by the client is company-specific, through name space or virtual host configuration, the @companyid portion is optional.
Allowed From is a list of IP addresses or ranges, such as 192.168.1.240-255, or 10.*.*.*. If this value is filled in, the location must connect from an address matching one of the values. Note that this is the IP address from the server's viewpoint, which may differ from the remote client's internal IP address if access is through a router that does address translation. If you aren't sure what a location's IP address is from the server's viewpoint, temporarily leave this field blank, then monitor server logs as the location connects, and its IP address will be visible. Note also that IP addresses can be dynamic, though in that case they will likely be from a range, so a wildcard might be appropriate.
Type indicates if the location supports a system client or browser client. System clients run the CirrusPrint client software to support printing to remote printers and storage on remote file systems. Browser clients can receive and view jobs via a web browser on a PC or mobile device.
Email enables browser clients to recover their login information. The browser client settings can request that any logins associated with this email be sent to the address indicated. Note that email server settings must be configured for this feature to work.
Save and Send Connection Link is available as long as email and at least one public host name is defined in the configuration. The action saves the record and sends an auto-configuration link to the email address specified in the Email field. The current location must be active and a valid email provided in the Email field. An email with a temporary link is sent to that address. The temporary link uses the public hostname selected and includes a secure random value.
For browser clients, the email contains a link that will connect to the server and set up the browser, complete with a login. The same link can be used from multiple browser clients, such as a desktop PC and a mobile device, until it expires. For system clients, the link provides information that can be copied and pasted into a Windows client manager or Linux command line.
The links are valid for a configurable amount of time, defined in the Configuration page.
Save and Send Extension Link is available as long as email and at least one public host name is defined in the configuration. The action saves the record and sends an auto-configuration link to the email address specified in the Email field. The current location must be active and a valid email provided in the Email field. An email with a temporary link is sent to that address. The temporary link uses the public hostname selected and includes a secure random value.
The email includes information on how to install the SDSI Web Extension, along with configuration instructions.
Notification can be enabled for browser users. An email is sent to the configured email address when one or more jobs are waiting to be viewed in the browser interface. The email is sent within a few minutes of job creation if there is no active browser interface for the user. An email is sent once per 24 hours, or if the user visits the browser interface, closes it, and a new job arrives later.
Location is inactive, if checked, indicates this location can't connect, though the location record remains on file.
Platform is a read-only checkbox reported by the client when it connects, indicating if it is running on Windows.
Ghostscript is a read-only checkbox reported by the client if it finds a copy of Ghostscript on the client system. On Windows, the client looks in C:\Program Files\gs or C:\Program Files (x86)\gs for the highest Ghostscript version installed. On Linux, it looks for /usr/local/bin/gs or /usr/bin/gs.
Disable Cache, if checked, instructs CirrusPrint to not use object caching when sending jobs to this location. Object caching reduces network data usage by parsing documents for redundant objects and only sending them once to the target location. If remote locations have modest bandwidth available, this reduces the time it takes many jobs to be sent to the destination client. However, parsing jobs for objects also takes computing resources, as does managing the objects at the remote site. If you have a fast network and fast client systems, disabling cache may result in improved delivery performance.
Press the Save button to save any changes, or the Delete button to remove an existing record.
When a location created, an "autosend" local path and remote device is created, named to match the location ID.
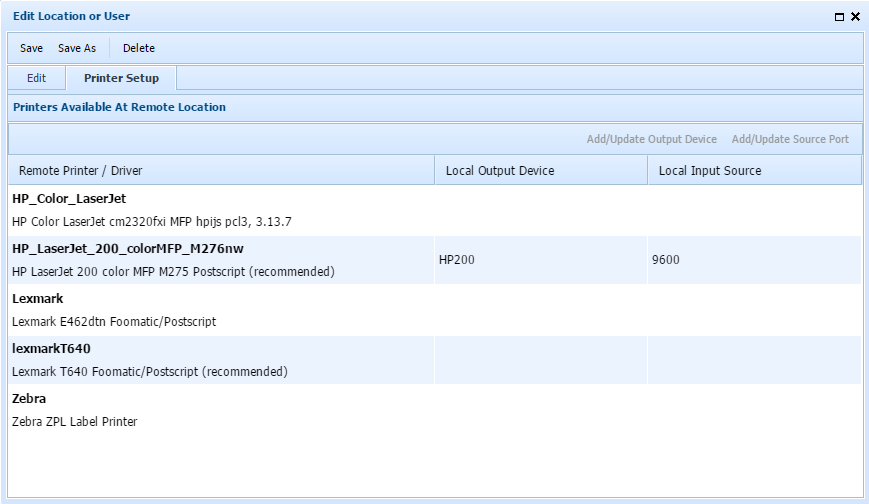
Printer Setup Tab
This section provides an easy method for configuring a network port input and output device for a remote printer. Printers are reported by connecting system clients, so this step is performed after a location is defined and has logged in at least one time.
To set up a printer, select a remote printer name in the first grid column. Then choose perform these steps:
| • | Click the Add/Update Output Device button to display the output device edit form. The selected printer will be the target of the device. Choose appropriate output types, such as PCL5 or PostScript, and set the device ID to a concise name. The default ID matches the remote printer name, but if this is too long or descriptive, you can change it. Once an output device record has been created for the remote printer, it is available to send jobs to through CirrusPrint. Some tools can utilize the output device record directly, such as the browser client and the web extension, or programs that use the API. However, if you want to define system printers to print to this device, you need to configure a source port, in the next step. |
| • | Click the Add/Update Source Port button to display the input source edit form. This option is available once an output device has been defined. The source port will target the device ID defined for the printer. When you save form, a port number is assigned and displayed. This port can be used by system printers to print to the remote printer. On Windows, a system port is also created in the registry, named in the format "cp20_companyID_sourceID", forcing underscores to ensure a valid name (such as "cp20_acme_winsvr_hp4000"). |
System Printers
System printers can now target the source port. The method is system-dependent.
For Windows, add a new printer, or edit an existing one, through Control Panel. There are two key settings: choosing the correct port, and selecting a compatible driver. If the printer will be defined on the same system as the CirrusPrint server, there is a port already defined, "cp20_companyID_sourceID". If the printer is defined on a different system, you need to create a new TCP/IP port that sends printing to the CirrusPrint server and the port number defined in the input source record. Choose a printer driver that is compatible with the remote printer, to ensure that documents will print correctly at the remote location.
For Linux, use the lpadmin and lpinfo command line tools to create a new printer or update an existing one.
| • | lpinfo -m will display available printer models (the CUPS nomenclature for print drivers). There are often hundreds of them defined in CUPS, so it is helpful to use a search pattern to limit the list. For example, lpinfo -m | grep -i postscript | grep -i generic will display a short list of generic PostScript drivers. The model name is the first word, up to a space, in each line. |
| • | lpadmin -p "name" -m "model name" -v socket://address:port -D "description" adds or updates the printer named in the -p option. It creates a printer with the model (driver) indicated, and targets the network port specified. The address value should be the name or IP address of the CirrusPrint server, and the port value should be the input source port assigned to the remote location printer in the CirrusPrint input source configuration. |